
In this article, let's build a simple message app UI in Flutter by applying everything we have learned so far about Flutter.
Message App UI in Flutter
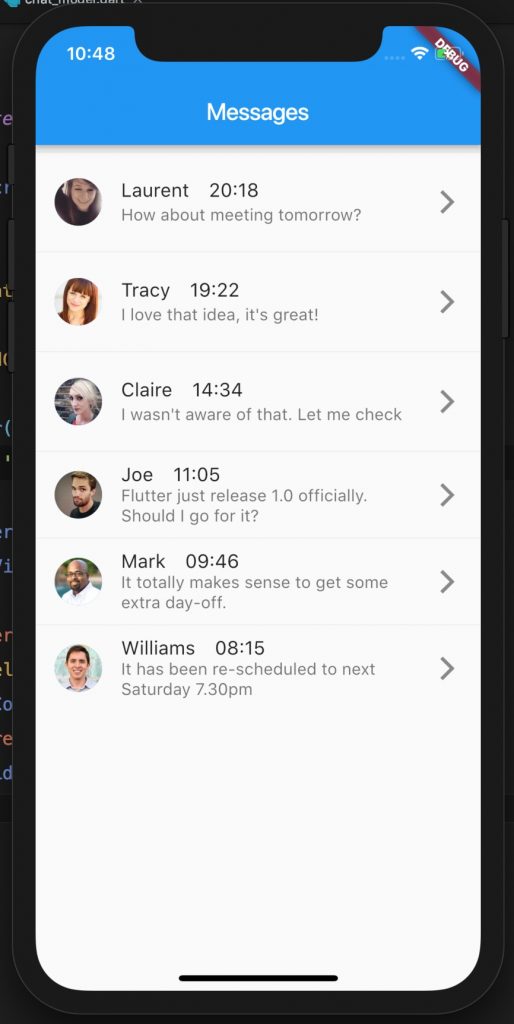
Before starting to build the app, let see the message app UI that we're going to build throughout this article.

By the look of it, you can see that this message app UI is built basically from ListView with many ListTile as children.
Design the structure
The main content component should be ListView, and ListTile for each row of message.
In each ListTile, there have one circle image, a Row of title, a subtitle and an icon at trailing position.
So the widget tree can be described like this:
ListView
  - ListTile
    - leading: CircleAvatar
    - title: Row
      - Text
      - Text
    - subtitle: Text
    - trailing: Icon
Design data model
For the simplicity of the tutorial, we won't fetch message data from anywhere, instead, we create a simple data model.
class ChatModel {
  final String avatarUrl;
  final String name;
  final String datetime;
  final String message;

  ChatModel({this.avatarUrl, this.name, this.datetime, this.message});
}
Also, generate some dummy data to be used.
static final List<ChatModel> dummyData = [
    ChatModel(
      avatarUrl: "https://randomuser.me/api/portraits/women/34.jpg",
      name: "Laurent",
      datetime: "20:18",
      message: "How about meeting tomorrow?",
    ),
    ChatModel(
      avatarUrl: "https://randomuser.me/api/portraits/women/49.jpg",
      name: "Tracy",
      datetime: "19:22",
      message: "I love that idea, it's great!",
    ),
    ChatModel(
      avatarUrl: "https://randomuser.me/api/portraits/women/77.jpg",
      name: "Claire",
      datetime: "14:34",
      message: "I wasn't aware of that. Let me check",
    ),
    ChatModel(
      avatarUrl: "https://randomuser.me/api/portraits/men/81.jpg",
      name: "Joe",
      datetime: "11:05",
      message: "Flutter just release 1.0 officially. Should I go for it?",
    ),
    ChatModel(
      avatarUrl: "https://randomuser.me/api/portraits/men/83.jpg",
      name: "Mark",
      datetime: "09:46",
      message: "It totally makes sense to get some extra day-off.",
    ),
    ChatModel(
      avatarUrl: "https://randomuser.me/api/portraits/men/85.jpg",
      name: "Williams",
      datetime: "08:15",
      message: "It has been re-scheduled to next Saturday 7.30pm",
    ),
  ];
Design message app UI
Our next step is to create ListTile for each message row.
ListTile(
  leading: CircleAvatar(
    backgroundImage: NetworkImage(_model.avatarUrl),
  ),
  title: Row(
    children: <Widget>[
      Text(_model.name),
      SizedBox(
        width: 16.0,
      ),
      Text(
        _model.datetime,
      ),
    ],
  ),
  subtitle: Text(_model.message),
  trailing: Icon(
    Icons.arrow_forward_ios,
  ),
),
Where does the _model come from? Well, it is the ChatModel instance that we lookup through index of itemBuilder of ListView .
ListView.builder(
  itemCount: ChatModel.dummyData.length,
  itemBuilder: (context, index) {
    ChatModel _model = ChatModel.dummyData[index];
    // return ListTile
If you try to run it, you will see each message row looks pretty close to each other. Therefore, we should wrap message row inside a Column and combine with Divider to separate each row.
ChatModel _model = ChatModel.dummyData[index];
return Column(
  children: <Widget>[
    Divider(
      height: 12.0,
    ),
    ListTile(
This is what we have so far.
Update styling
The basic structure is done very quick in Flutter. In contrast with native Android, iOS or React Native, it takes seriously lots of code to achieve this simple UI.
However, it doesn't look aesthetic enough to the eyes, we can do some styling a bit for the app.
The avatar image is little small, we can try to increase its size.
leading: CircleAvatar(
  radius: 24.0,
  backgroundImage: NetworkImage(_model.avatarUrl),
),
The date time text seems little too big, reduce it.
Text(
  _model.datetime,
  style: TextStyle(fontSize: 12.0),
),
Trailing icon should be smaller.
trailing: Icon(
  Icons.arrow_forward_ios,
  size: 14.0,
),
It looks much better now.
Summary
Congratulation! You have built yourself a beautiful message app UI in Flutter with only several lines of code.
From this basic message app UI, you can try to add features or customize. It is a really good way to practice Flutter coding.
Complete source code for this tutorial can be found here https://github.com/petehouston/flutter-simple-message-app-ui